How to Find Duplicate Photos in OneDrive on Mac
Find duplicate photos in OneDrive on Mac: download a batch, scan a working copy, check each group and learn what deleting does on your other devices.
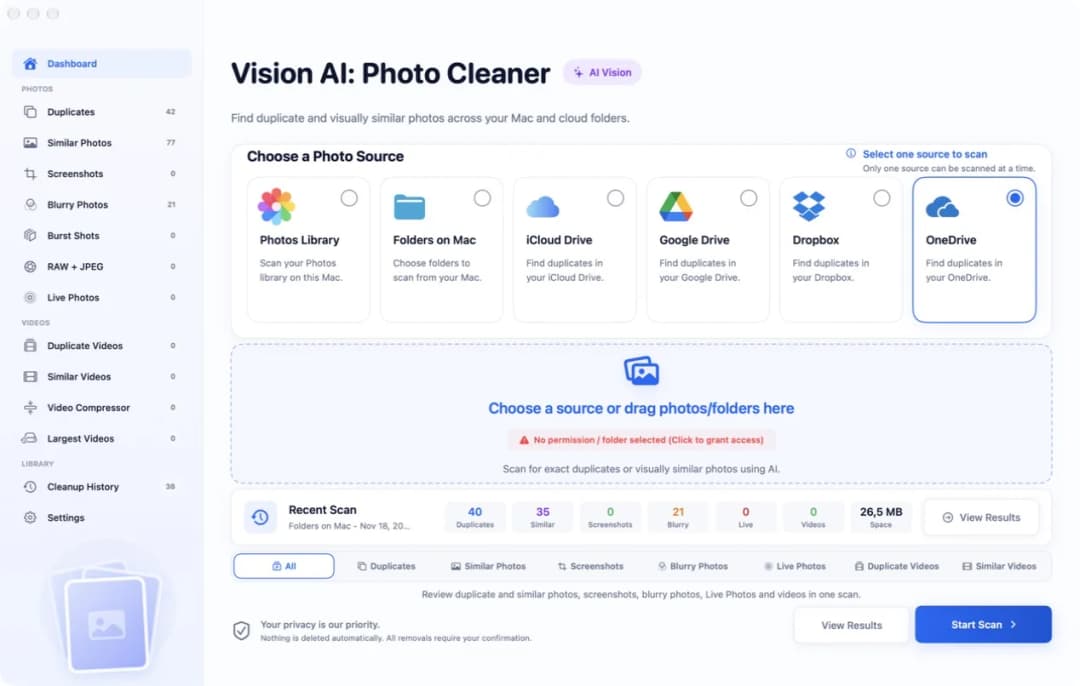
Think of a magic shelf. The same shelf stands in every room of the house. If you put a book on it in the kitchen, the book is also there in the bedroom. If you take a book away in the bedroom, it is gone in the kitchen too. OneDrive is such a shelf for your photos. What you do on your Mac also happens on your phone and on the OneDrive website.
That is handy, but it makes tidying up a little risky. This guide shows you how to find photos that are on the shelf twice without taking the wrong one away everywhere. We show the steps in Vision AI: Photo Cleaner. It is our app, and we say so openly. We checked the steps with version 1.4.3 on November 19, 2026. We did not scan a real OneDrive folder for this guide. We scanned a working copy of test photos on a test disk called Photo Drive. The numbers in the pictures come from this one test and are not a promise for your photos.
1. Bring the photos down to your Mac first
Open Vision AI: Photo Cleaner. At the top you see the places where photos can be, and one card says OneDrive. Click it. If you have not chosen a folder yet, a red line says No permission / folder selected (Click to grant access). The app does not sign in to your Microsoft account. It only reads the OneDrive folder that the OneDrive app keeps on your Mac, and only after you choose that folder yourself.
There is one catch. OneDrive can show a photo by name while the photo itself is still in the cloud. A photo like that cannot be compared properly. So open your OneDrive folder in the Finder, right-click the folder with the photos and choose Always Keep on This Device. Wait until OneDrive has finished downloading. If your Mac is nearly full, do one folder at a time.
2. Make a working copy and scan it
Now comes the safe trick. Do not tidy the magic shelf itself. Copy one folder of downloaded photos to a place outside OneDrive and tidy the copy. Use Copy and Paste in the Finder, so the photos in OneDrive stay where they are. Make sure the new place is not synced. If OneDrive also syncs your Desktop or your Documents folder, do not put the copy there.
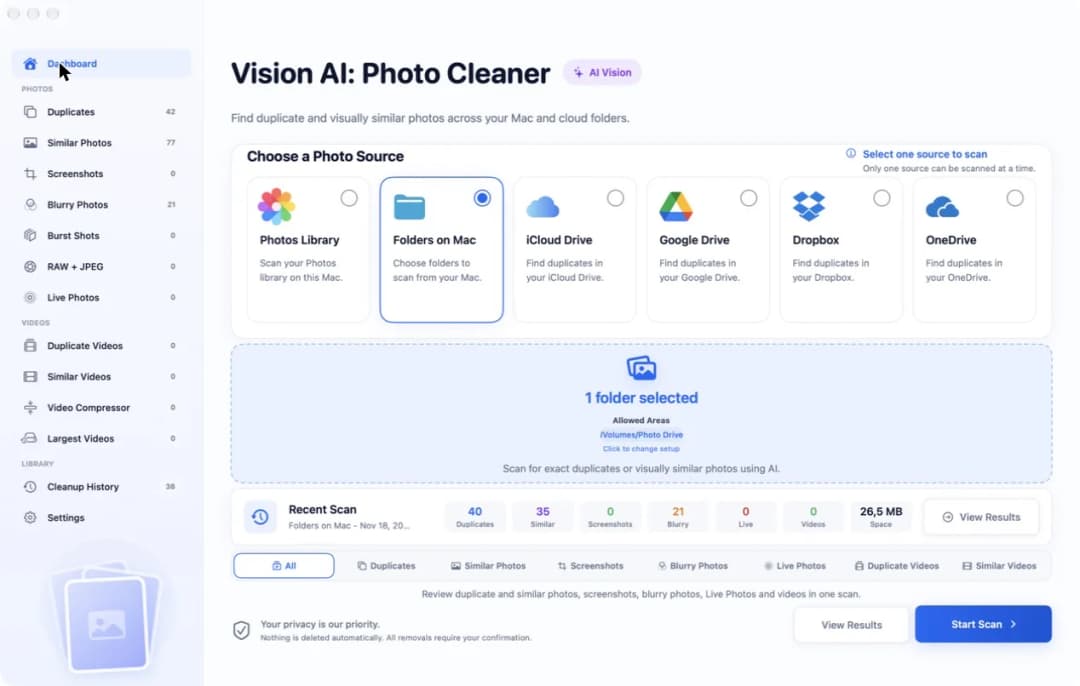
In Vision AI: Photo Cleaner click Folders on Mac and then the blue area below the cards. A window opens. Pick your working copy and confirm. The blue area now shows 1 folder selected and, under Allowed Areas, the path of the folder. In our test that was /Volumes/Photo Drive. Choose All in the row of scan types and click Start Scan. The photos are looked at on your Mac. The app does not upload them anywhere.
3. Read the list of duplicate photos
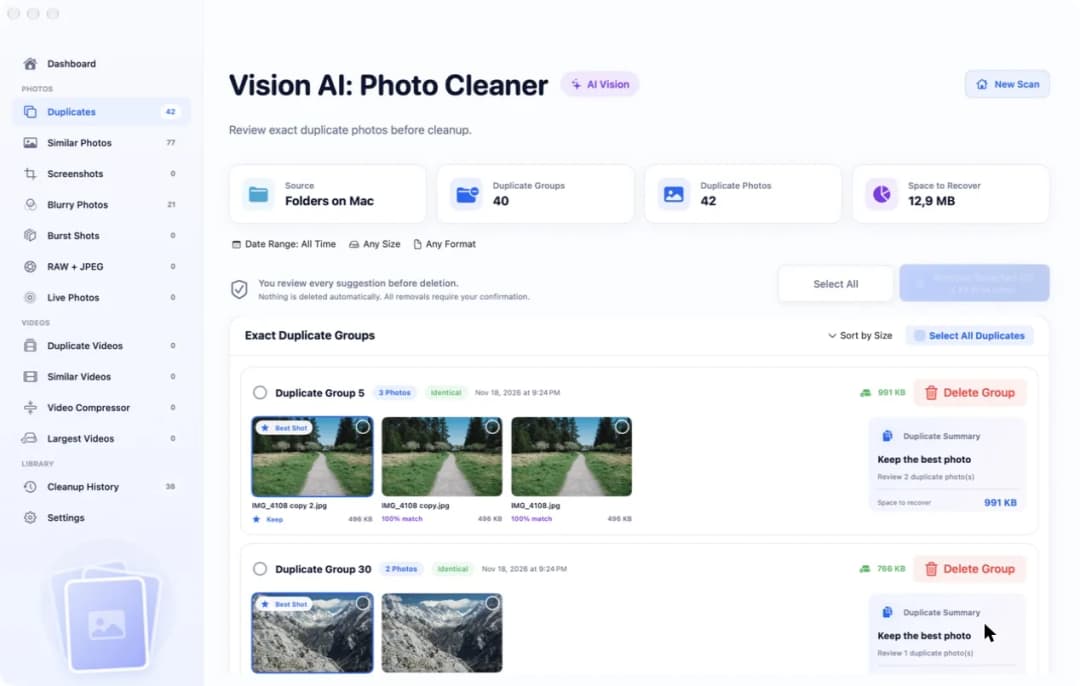
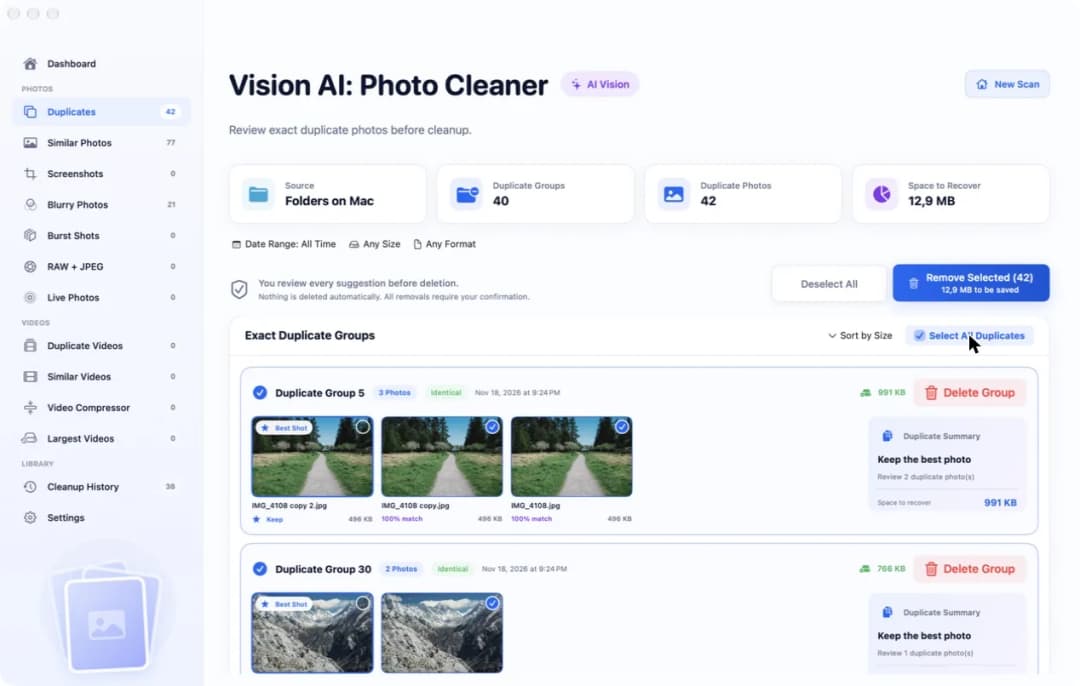
When the scan is done, click Duplicates in the sidebar. Four tiles at the top tell you what was found. In our test they said: Source Folders on Mac, 40 Duplicate Groups, 42 Duplicate Photos and 12,9 MB Space to Recover. A duplicate is a photo that is there more than once, exactly the same, like twins.
Below the tiles, the photos that belong together sit in one group. Our first group had 3 photos and the label Identical. One photo wears a small badge that says Best Shot, and below it the word Keep. That is the copy the app wants to keep. The other two say 100% match. In this group each photo was 496 KB, so removing the two extra copies would give back 991 KB.
4. Check which folder each copy is in
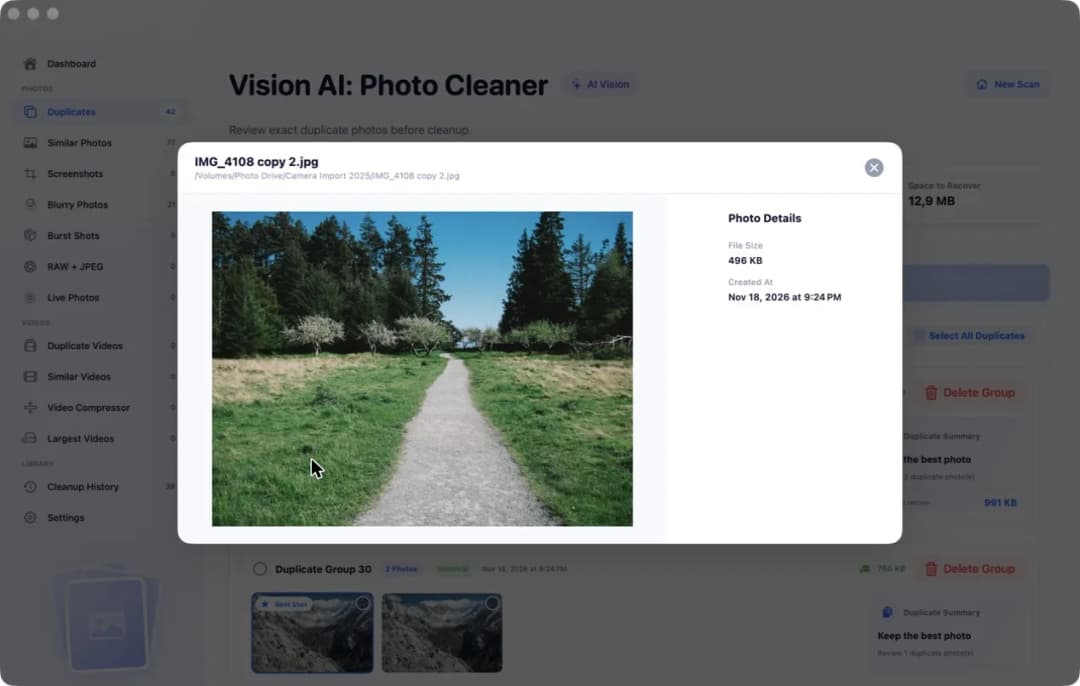
With OneDrive it matters a lot where a photo is. The same picture can be in your family folder and also in a folder you share with other people. If you take it out of the shared folder, the others lose it too. So double-click a photo. It opens big, and under its name you see the full path. In our test that was /Volumes/Photo Drive/Camera Import 2025/IMG_4108 copy 2.jpg.
Next to the big picture, Photo Details shows the File Size and Created At, the day the file was made. The folder names in your working copy are the same as in OneDrive, so the path tells you where the twin sits on the real shelf. Photos that are only almost the same, such as an edited picture or a smaller copy for sending, are not in this list. You find them under Similar Photos in the sidebar. Look at those one by one.
5. Tick the extra copies in the working copy
Go back to Duplicates. You can tick photos one by one with the small circle in their corner. If you have looked through the groups and trust them, click Select All Duplicates. In our test the blue button then said Remove Selected (42) and 12,9 MB to be saved.
Look closely at the picture below. In every group the photo with the Best Shot badge has no tick. So one copy of each photo stays, and only the extra ones are marked. If you would rather keep a different copy, for example the one in the family folder, take its tick away and tick the other one. Now you have a clear list of what is double. All of this happens in your working copy. On the magic shelf nothing has changed yet.
6. Know what happens before you delete in OneDrive
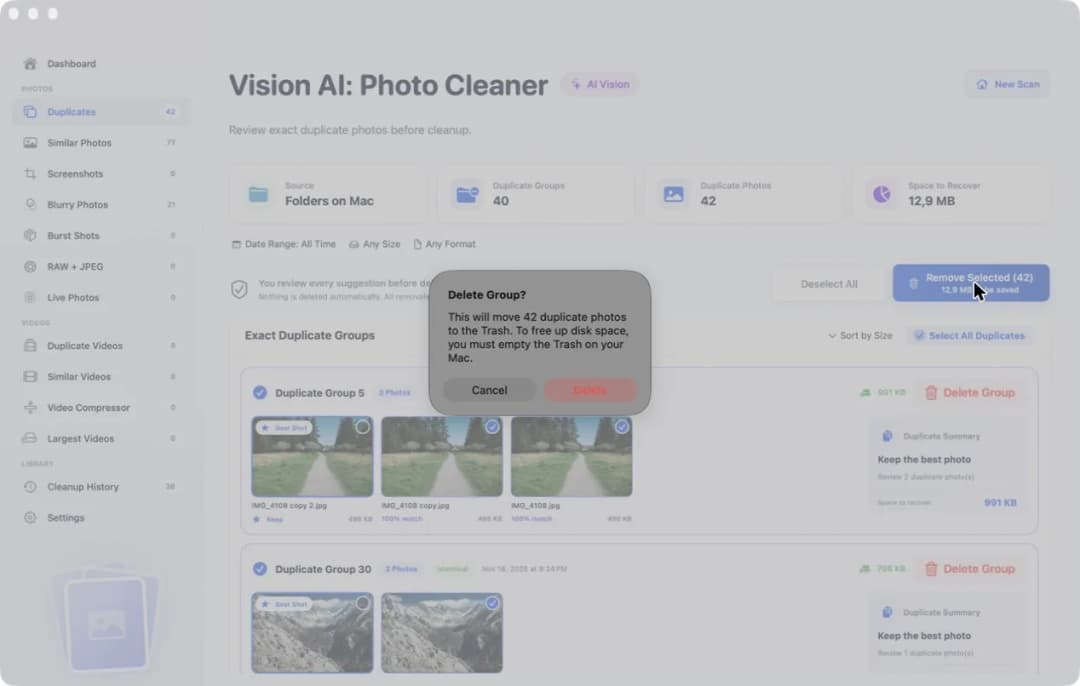
Click Remove Selected. The app does not delete right away. It asks first. In our test the message said that 42 duplicate photos will be moved to the Trash, and that you must empty the Trash on your Mac to free up disk space. Click Cancel to look again, or Delete if you are sure. We stopped at this question in our test and did not delete the photos. Nothing is deleted automatically. Removing needs the full version. Scanning and looking are free.
If you later do the same in the real OneDrive folder, remember the magic shelf. A photo you delete there also disappears from the OneDrive website and from your other devices as soon as OneDrive has synced. If you took the wrong one, look in the Recycle Bin on the OneDrive website soon. How long photos stay there depends on your account. And if you only want more room on your Mac, do not delete at all. Right-click the folder in the Finder and choose Free Up Space. The photos then stay in OneDrive and only leave your Mac.
How to find duplicate photos in OneDrive on Mac
- 1
Download the photos
In the Finder, right-click the OneDrive folder with the photos, choose Always Keep on This Device and wait until the download is done.
- 2
Scan a working copy
Copy the folder to a place outside OneDrive. In Vision AI: Photo Cleaner click Folders on Mac, pick the copy and click Start Scan.
- 3
Check the groups
Click Duplicates in the sidebar. Double-click a photo to read which folder it is in. One copy in each group is marked Best Shot.
- 4
Decide before you delete
Click Select All Duplicates and check the ticks. Remember that deleting in the OneDrive folder also deletes on your other devices.
Frequently asked questions
Does Vision AI: Photo Cleaner look into my OneDrive account in the cloud?▼
No. The app does not sign in to your Microsoft account. It reads the OneDrive folder that the OneDrive app keeps on your Mac, after you have chosen that folder. Photos that are only on the OneDrive website must be synced to the Mac or downloaded first.
Can I look for duplicates without changing anything in OneDrive?▼
Yes. Download the photos, copy one folder to a place outside OneDrive and scan the copy with Folders on Mac. Whatever you do in the copy stays in the copy.
What happens if I delete a duplicate in the OneDrive folder?▼
OneDrive carries the change to the cloud and to your other devices. The photo is then gone there too. If it was the wrong one, look in the Recycle Bin on the OneDrive website soon.
Why should a photo be downloaded before I compare it?▼
OneDrive can show the name of a photo while the photo itself is still in the cloud. The app may already show a match for such a photo. Download it and look at the real picture before you decide what stays.
Can the Photos app find duplicates in my OneDrive folder?▼
No. Photos has a Duplicates album, but only for the Photos library that is open. A OneDrive folder in the Finder is a folder with files and not a Photos library, so Photos does not look through it.

Tidy the copy first, then the shelf
Vision AI: Photo Cleaner looks through a folder on your Mac and puts the same photos into groups. Scanning and looking are free. You decide what goes.

Sources
Related guides
· 9 min read
How to Find Duplicate Photos on an External Drive on Mac
Find duplicate photos on an external drive on Mac: choose the drive as a folder, scan it, check each group and remove only the extra copies.

· 9 min read
How to Delete Duplicate Photos on Mac
Delete duplicate photos on Mac: find copies in folders with the Finder, group exact and similar photos with Vision AI, and move extras to the Trash safely.

· 9 min read
How to Remove Duplicates in Photos Library on Mac
Remove duplicate photos from the Photos library on your Mac: use the Duplicates album, scan for look-alikes, check each group and get space back safely.
Ready when you are
Download Vision AI - Photo Cleaner for Mac
Find duplicate and similar photos, review large videos and compress videos locally on your Mac. Choose what to keep and confirm every cleanup.
By using Vision AI - Photo Cleaner, you agree to our Terms of Use and Privacy Policy.